How to Properly Align Your Laser Mirrors for Maximum Precision
If you’ve noticed that your laser cutter’s performance decreases at the far corners of the bed, or if your cuts are slanted and inconsistent, the culprit is likely mirror misalignment. Proper mirror alignment—ensuring the laser beam travels perfectly through the center of every optic and hits the center of the lens—is the single most important skill for a CO2 laser operator.
This guide walks you through the 3-mirror alignment process used in most CO2 laser machines.
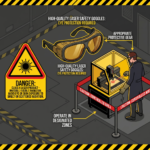
Safety First!
Aligning mirrors requires firing the laser while the machine is open.
- Wear Safety Glasses: Ensure you have 10,600nm (CO2) rated safety glasses.
- Low Power: Set your machine’s pulse power to just enough to mark the tape (typically 10-15%).
- Hands Clear: Keep your hands away from the beam path.
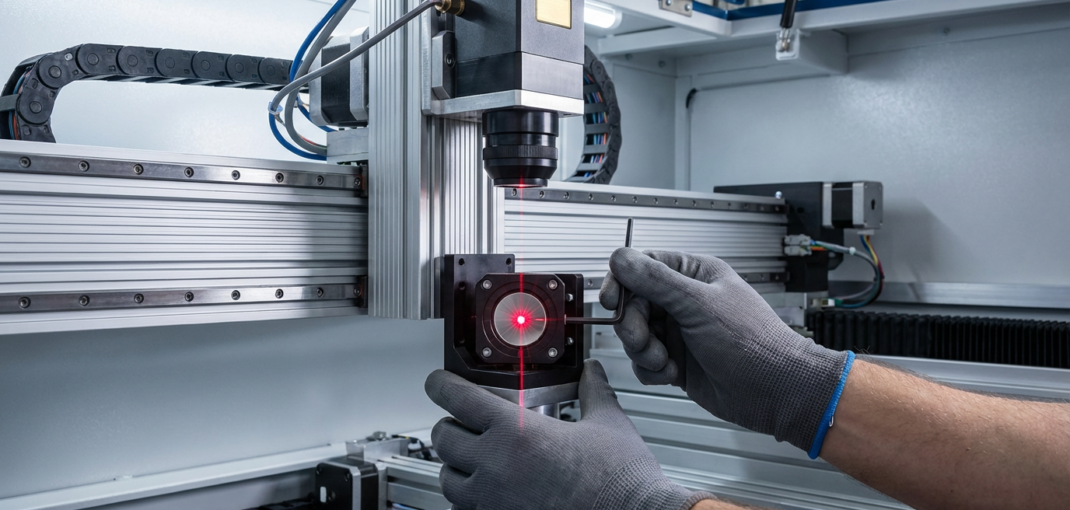
The 3-Mirror System
Most machines use three mirrors:
- Mirror 1: Fixed near the output of the laser tube.
- Mirror 2: Moves along the Y-axis (front to back).
- Mirror 3: Moves along the X-axis (left to right) on the laser head.
Step 1: Aligning Mirror 1 to Mirror 2
The goal is to ensure the beam from the tube hits Mirror 1 and reflects perfectly parallel to the Y-axis rail into Mirror 2.
- Place a piece of masking tape over the opening of Mirror 2.
- Move the Y-axis (Mirror 2) as close as possible to Mirror 1. Pulse the laser to create a “mark.”
- Move the Y-axis to the far end of the machine. Pulse again.
- The Adjustment: If the two dots do not overlap perfectly, adjust the screws on Mirror 1.
- Adjust the screws until the “far” dot lands exactly on top of the “near” dot.
- It doesn’t matter where on the mirror the dots are yet; they must just be in the same spot at both distances.
Step 2: Aligning Mirror 2 to Mirror 3
Now we ensure the beam travels perfectly parallel to the X-axis rail from Mirror 2 to Mirror 3.
- Move the laser head (Mirror 3) to the left side (closest to Mirror 2). Pulse the tape on Mirror 3.
- Move the laser head to the far right. Pulse again.
- The Adjustment: Adjust the screws on Mirror 2 until the “far” dot overlaps the “near” dot.
- Once they overlap, check if they are centered on the Mirror 3 opening. If not, go back to Step 1 and slightly adjust the “home” position of the beam.
Step 3: Centering the Beam Down the Nozzle
The final step is to ensure the beam hits the center of the focus lens and exits through the center of the nozzle.
- Place tape over the bottom of the nozzle.
- Fire a short pulse.
- If the hole is not centered, adjust the screws on Mirror 3.
- Verticality Check: The beam must hit the lens perpendicularly. If it enters at an angle, the focal point will be distorted.
Tips for Success
- Be Patient: Alignment is a game of millimeters. Small adjustments make big differences.
- Tape Layering: Don’t let too much residue build up on the mirrors from the tape.
- Check at All Corners: Once done, test the pulse at all four corners of the machine bed. They should all be perfectly centered.
Conclusion
Mirror alignment is not a “one and done” task. Vibration, temperature changes, and moving the machine can all cause misalignment. Checking your alignment regularly ensures that your CNC laser remains a precision tool rather than a source of frustration.
Looking for professional mirror mounts or high-reflectivity Mo/Si mirrors? Check out the Laser Optics selection at CNC Parts Market.